PadEye Calculator
(shackle compatibility & design capacity)
A padeye (Fig 1; sometimes referred to as 'padear') is a term used to describe a specialised lug for attaching lifting or restraint shackles.
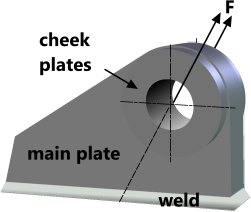
Fig 1. Padeye Parts
PadEyes uses the compatibility of a well-known shackle design⁽¹⁾ to dimension a suitable mating padeye.
Applications
Lifting
The applied load (F) for lifting appliances can be determined by any suitable calculation facility including CalQlata's lift rigging calculator. It is important, however, that appropriate factors (DAF, SF) are applied to any design load especially if the padeye is to be used repeatedly in ill-defined conditions.
Safety factors for lifting padeyes are normally slightly higher than those applied to restraint applications, such as seafastenings.
Seafastening
Padeyes may also be used for fastening equipment to a ship's deck, in such cases it is necessary to apply suitable factors for vessel motions (accelerations) in heavy seas (see CalQlata's vessel motions calculator).
Skewed Loading
A skewed load is a load applied out-of-plane with the padeye. Whilst it is not good practice to apply skewed loads to a padeye, if the skew is kept to an acceptable angle (<5°) and the applied load is significantly reduced (<50% SWL) to minimise localised bearing stress in the padeye and bending stress in the pin, it can be considered acceptable for non-critical applications. However, the resultant bending stress in the shackle and padeye should be considered in your calculations. In such circumstances, suitable (larger and tapered) clearances in the pin hole (C) and over the cheek plates (Cᴾ) should be considered.
Materials
In both the above applications, it is important to ensure that suitable materials are used for the manufacture of padeyes, such as certified carbon steel of a recognised grade and quality.
As it is essential that the welding used to anchor padeyes is also reliable, it should be carried out using coded welders and certified materials (welding rods) and recognised procedures.
Design Stresses
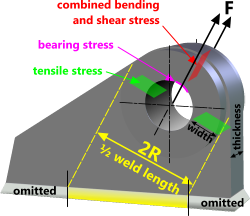
Fig 2. Padeye Design Stresses
Fig 2 shows the limiting stresses to be considered when designing a padeye.
Bearing stress is distributed across the main plate and the cheek plates. A high bearing stress will dissipate as the material locally deforms to generate a 'land' (or flat) increasing the contact area and decreasing the stress. When the stress has reduced to yield stress the localised deformation will be elastic and the contact area will not increase further.
Tensile stress is exerted on both sides of the eye and only through the main plate. The cheek plates are not included in this calculation. Tensile stress is always considerably less than the bending or shear stresses in the eye. The force from this stress generates the shear forces in the mounting weld.
Bending stress is analogous to a bar laid across the pin and centrally loaded, however, no part of the bar is in compression so its neutral axis is no longer through the centre of the cross-section. The cheek plates are not included in this calculation. As the width of the padeye section (Fig 2) is increased, the bending stress becomes the dominant component in the combined stress in this plane.
Shear stress is theoretically constant through this plane. The cheek plates are not included in this calculation. As the thickness of the padeye plate (Fig 2) is decreased, the shear stress becomes the dominant component in the combined stress in this plane.
Combined stress is the principal stress through the plane of bending and shear. This is always the weakest plane in a properly designed padeye and is therefore used as the defining stress in the design.
Maximum allowable stress is the maximum permitted stress at the design load. This is normally 40% of SMYS plate material for design loads less than 25t; 50% for loads less than 100t and 67% for loads greater than 100t, but should be according to the design code prevalent for any given project.
Welding
The weld length considered in PadEyes' calculations is conservatively limited to twice the indicated length ('2R') shown in Fig 2, i.e. half the total weld length each side of the main padeye plate, irrespective of the loaded angle (see Weld Length below).
As high quality welding is essential for reasons of security and/or safety, all welding on padeyes should be carried out by coded welders using approved procedures and certified materials (welding rods). Moreover, no stitch welding should be permitted in the active area of the weld length (Fig 2; '2R'). For this reason, a weld joint factor of 0.9 to 1.0 is reasonable for padeyes.
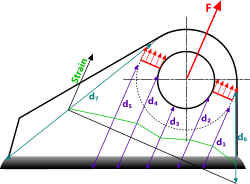
Fig 3. Weld Length Designation
Weld Length
The force (F) applied to a padeye is transferred to its mounting weld by induced strain in its main plate. The shortest distance from the source of the strain to the weld, in the same direction, will constitute the greatest strain and thus induce the highest force per unit length in the weld. Strain not directly in line with the applied force will be reduced due to triangulation of forces. Therefore, as shown in Fig 3, the strain outside d₁ and d₅ is of less importance with regard to weld strength under load than the strain between them.
This is the reason why CalQlata has limited the effective weld length to '2R' (Fig 2) on both sides of the main plate in PadEyes' calculations. Welding outside this area may be stitch welded if preferred and corrosion is not an issue, but full welding is essential between d₁ and d₅ (Fig 3)
Shackles
The padeye calculator includes a database of relevant dimensions for standard Bow and Dee shackles.

Fig 4. Relevant Shackle Dimensions
Shackles are elaborate 'U' Bolts designed for repeated heavy duty use. Standard shackles have been designed to accommodate padeyes that have also become standardised.
The relevant shackle dimensions used in PadEyes calculations, and displayed in the output data, are shown in Fig 4. Refer to Input Data & Output Data below for an explanation of the dimensional symbols.
PadEye Calculator – Technical Help
The padeye calculator is based upon the following calculation procedure:
1) Enter design load including factors (F)
2) Select a shackle size from the 'SWL' list
3) Enter cheek-plate and pin-hole clearances (C & Cᴾ)
4) Enter a maximum allowable stress for the padeye plate (σ)
5) And a few other dimensions (cheek-plate thickness, Young's modulus and weld joint factor)
PadEyes will determine the minimum padeye radius (R) by setting the combined stress equal to the maximum allowable stress (σ) in the eye of the padeye.
Units
The padeye calculator uses the Imperial and metric dimensions issued by a recognised shackle supplier. Metric units are millimetres and Newtons and Imperial units are inches and pounds-force. You switch between metric and Imperial units by clicking the button 'metric' or 'Imperial'
The name on the button shows the units that can be applied by clicking the button, not the units currently in use.
Shackle Database
SWL is in tons, which equates to units of 2,200lb or 1,000kg.
PadEyes does not convert the dimensions from one unit to the other.
If you are calculating in metric units, the shackle supplier's metric dimensions are used.
If you are calculating in Imperial units, the shackle supplier's Imperial dimensions are used.
The dimensions used in the calculations are common to all standard Bow and Dee shackles.
Input & Output Data (Fig 4 & 5)
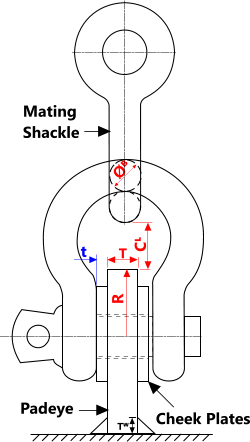
Fig 5. Clearance & Dimensions
Force (F) is the in-line load applied to the padeye including all load factors (see the technical help page for CalQlata's lift rigging calculator)
Cheek thickness (t) is the thickness of one of the two circular bearing cheeks welded either side of the main padeye plate. These cheek plates provide bearing stress support but are not normally included in the calculations for the strength of the padeye. The cheek plates outside diameter is normally machined to the same diameter as the shackle eye (Øᴱ). If this value is set to zero, the padeye calculator will assume that the main padeye plate is full width between eyes (wᴱ) minus the eye clearance (C).
Eye clearance (C) is the total clearance between the cheek plates and the shackle eyes. It is usual to set this clearance equal to 10% of the width between the eyes (wᴱ) or ¼" (6mm) whichever is the lower
Pin clearance (Cᴾ) is the diametral clearance between the shackle pin and the pin-hole. It is usual to set this clearance equal to 5% of the pin diameter (Øᴾ) or ¼" (6mm) whichever is the lower
Maximum stress (σ) is the maximum allowable stress for the padeye material under the limiting design load (F) (see Design Stresses above and Example Calculation below)
Young's modulus (E) is the elastic modulus for the padeye plate and the cheek plate material. There is little point in manufacturing these from different materials as the bearing stress will be concentrated on the material with the highest elastic modulus reducing the beneficial effect of the cheek plates.
Weld joint factor (WJF); it is normal to use coded welders on padeyes due to the consequences of failure. Your weld joint factor should therefore be; 0.9<WJF<1.0
Output Data:Plate thickness (T) is the space left after removing the cheek plates (2t) and clearance (C) from between the shackle eyes (wᴱ). This thickness is normally about twice the thickness of one cheek plate
Padeye radius (R) is the minimum radius necessary to support the combined stress around the eye of the padeye. If you make the radius of your manufactured padeye greater than 'R', the safety factor will be greater than that entered (SMYS ÷ σ)
Padeye clearance (Cᴸ) is the throat clearance between 'R' and a mating shackle of the same size
Weld thickness (Tᵂ) is the thickness (or the 'leg') of the mounting weld
Hole diameter (Øᴴ) is the diameter of the hole in the main padeye plate and the cheek plates, it is equal to the pin diameter (Øᴾ) plus the pin clearance (Cᴾ)
Pin diameter (Øᴾ) is the diameter of the shackle pin#
Width between eyes (wᴱ) is the width between the inside of the shackle eyes#
Eye diameter (Øᴱ) is the outside diameter of the eyes of the shackle#. This is normally used to size the outside diameter of the cheek plates#
Throat clearance (Cᵀ) is the dimension between the outside diameter of the shackle pin and the inside of the shackle bow. It provides clearance for a mating shackle and the padeye
(> Øᴮ + R - ½Øᴴ)#
Bow diameter (Øᴮ) is the diameter of a section through the shackle bow#
Bearing stress (σB) is the stress induced in the surface of the padeye and cheek plate materials due to point contact. This value is provided for information only.
Bending stress (σb) is the highest bending stress in the material around the hole of the padeye main plate. The cheek plates are not included in this stress calculation. This stress is coincident with the shear stress (τ)
Tensile stress (σt) is the stress in the material around the hole of the padeye main plate. The cheek plates are not included in this stress calculation
Shear stress (τ) is the highest shear stress in the material around the hole of the padeye main plate. The cheek plates are not included in this stress calculation. This stress is coincident with the maximum bending stress (σb)
# taken from a database of dimensions for the selected shackle
Example Calculation
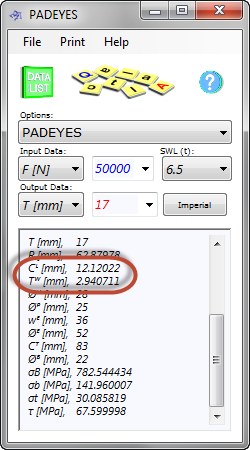
Fig 6. Example CalQlation
A design load of 50,000N (including load factors) and a safety factor of 2. Your forgemaster has sufficient SAE 1018 available
Because the padeye is to be welded (cheek plates and mounting), the CEV should be kept below 0.39. You can determine this yourself or you can use CalQlata's carbon steel calculator that shows the CEV for this material ranges between 0.25<0.35 making it suitable for welding.
The minimum yield for this material is 49<60ksi (337.8<413.7MPa). If we divide the lower SMYS from the range by 2 we get 169MPa.
Select a shackle with a carrying capacity greater than 'F': 50,000N = 5t⁽²⁾. The shackle with the next highest carrying capacity in the SWL list is 6.5t
Set clearances to 3mm and cheek plate thickness 8mm
The padeye clearance (Fig 5; Cᴸ) is 12.12mm (Fig 6), which is acceptable.
A minimum weld thickness of 3mm is required for the lengths shown in Fig 2. The omitted lengths of weld may be smaller or stitched as they are not included in the weld strength calculation.
Calculation Errors
Incorporation of an undersized shackle may result in negative values for R or T.
Improving unacceptable answers can usually be achieved by modifying 't' and/or 'σ'
Applicability
PadEyes is applicable to all lugs and eyes that use a pin in a holed plate to restrain an in-plane load.
Accuracy
There is no margin of error in these calculations. The only uncertainties are the applied load and maximum allowable stress of the padeye material.
Notes
- Green Pin (https://www.vanbeest.com/)
- Using CalQlata’s UniQon calculator
Further Reading
You will find further reading on this subject in reference publications(9 & 45)

